Follow Zube on Twitter

Never miss an important update on your project

An important part of Agile project management is being able to quickly adapt to changing requirements. This latest release introduces notifications, which allow you stay up-to-date with what’s happening across your projects. You can now specify general notification settings for your project, as well as subscribe to individual Cards, Epics and Tickets.

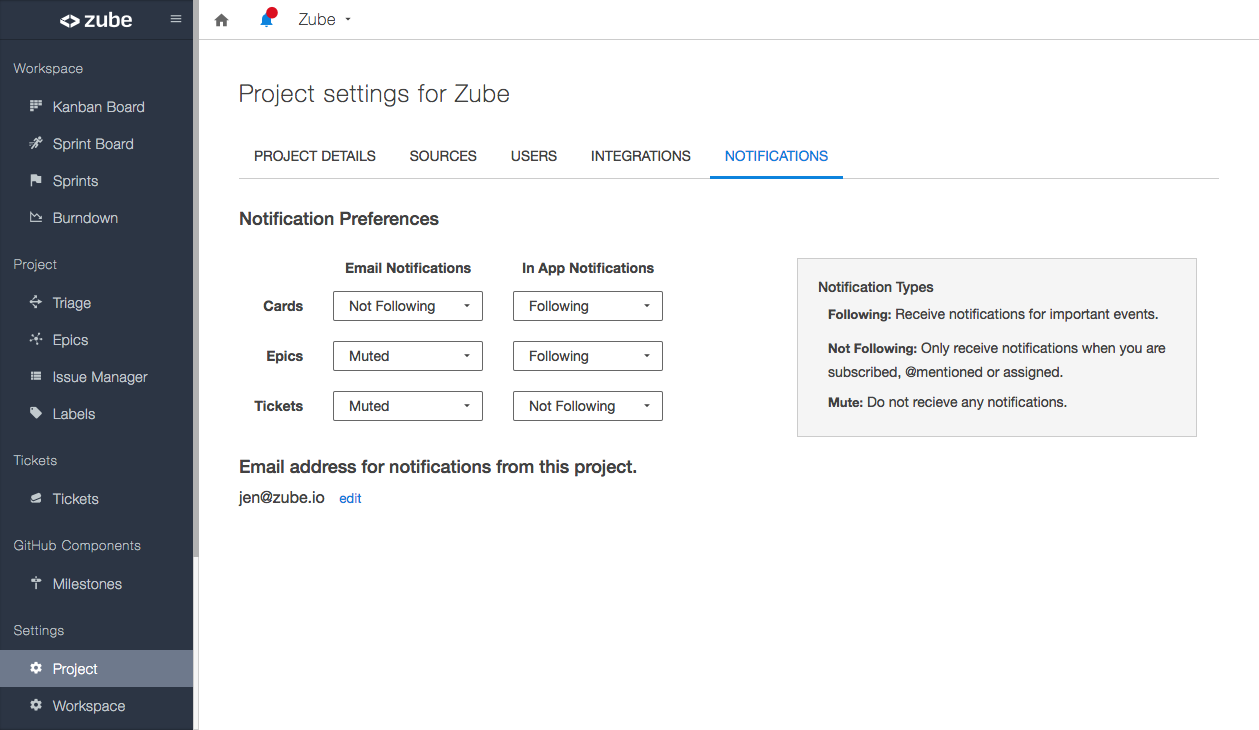
Notifications inside of Zube will appear in the header under the bell icon. The notification icon will turn blue with a red dot when you have unread notifications.

To change your notification settings, head to your Project’s Settings page and click the notifications tab where you’ll see the notifications options for Cards, Epics and Tickets. You can chose what level of notifications you’d like to receive for each item both via email and inside of Zube. There are three notification levels:

  • Following: Following means that you will receive notifications for all important events for Cards, Epics or Tickets such like when a Ticket is created or the status of a Card changes.

  • Not Following: Not Following means that you will only be notified when you are subscribed to; @mentioned within; or assigned to a Card, Epic, or Ticket. This is the default setting.

  • Muted: Muted means you will not receive any notifications unless you are subscribed to individual Cards, Epics or Tickets.

You can change which email address you’d like your email notifications sent to from the settings page as well.

Customize your notification preferences

We’ve also released a Slack integration! You can now be notified of important events on Zube via Slack. To integrate Zube with Slack, head to the Project Settings > Integrations page, click the Add To Slack button and follow the authentication directions.

Seamlessly organize and track your cards

If you have a bunch of cards that belong together, you can now group them together using an epic. Epics are a fundamental component of Agile and are made up of a bunch of Agile stories, hence the name. But you don’t have to subscribe to a particular flavor of Agile to get a ton of value out of epics on Zube. Once you have grouped some cards together into an epic, you’ll be able to see how the cards are progressing through your workflow, and the status of the epic will automatically reflect the status of its linked cards.

Viewing all of your epics

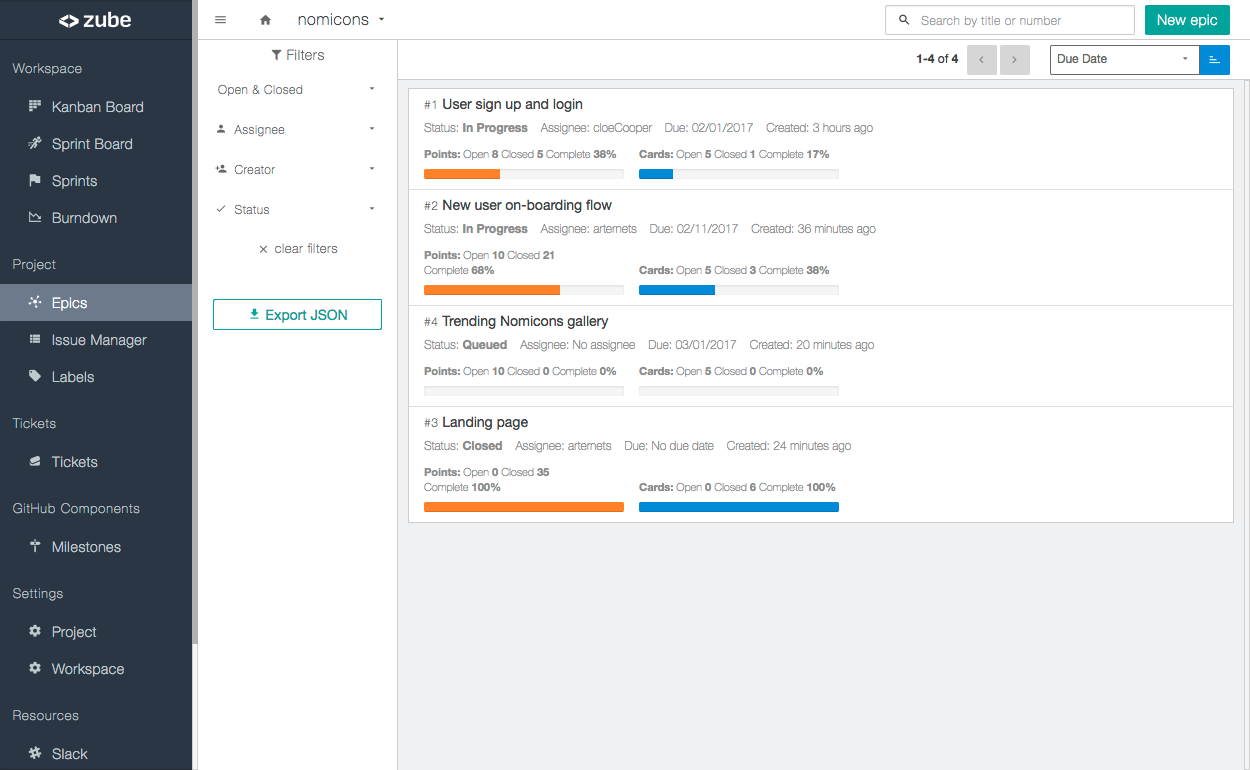
You can see all of your epics on a project by clicking on the Epics link on the navigation sidebar. You can then quickly filter and sort your epics to find just what you’re looking for. The epics listed out on this page have a progress bar overview of their cards that displays both card count and the number of story points. You can also create new epics on this view using the “New Epic” button at the top of the page.

Quickly find and sort your epics

A single epic

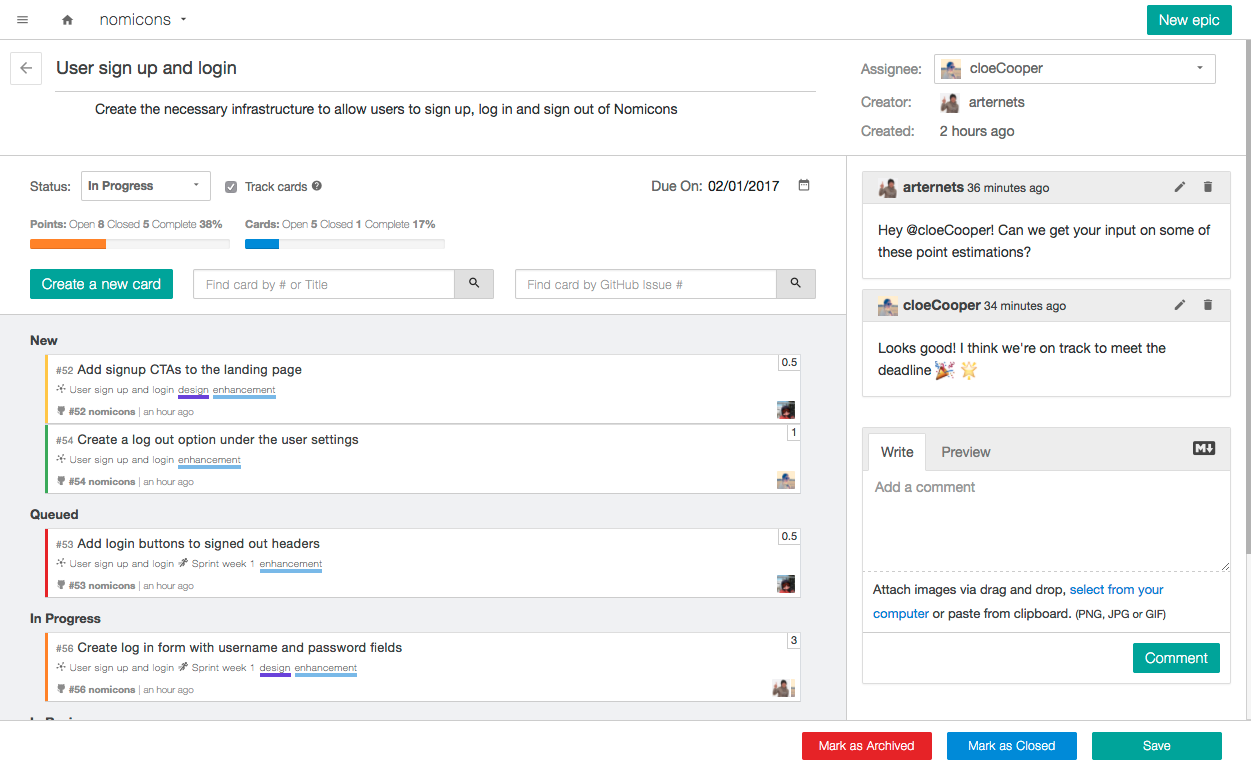
When you open an epic, you’ll see a list of its cards, broken down by card status, as well as a progress bar overview. On the right is a chat area so you can talk about your epic. You can quickly add cards to an epic from this view by either creating a new card or searching for an existing card. If you happen to be somewhere else in the app, you can add a card to an epic by opening up the card and selecting the appropriate epic from the Epic dropdown on the card sidebar.

An epic with attached cards

How to use Epics

Since epics are a new addition to Zube, here’s how we think they might be incorporated into your workflow. Epics are used to describe higher level concepts than cards, so it is probably easier to start by first making an epic that describes what you’re trying to accomplish. Then, from the epic show page, create all the cards (stories) that describe the work that needs to be done to complete the epic. You could now give your cards priorities, points, and assignees directly from the epic show page, but you’re probably better off switching to the Sprint Board (or Kanban Board or Triage) and organizing your cards there. If you’re doing scrum, or any sort of sprint based releases (which we recommend) then you’d proceed as usual by creating a new sprint and putting whatever cards on the sprint that you think you can accomplish during that period of time. It is typical for a single epic to span multiple sprints, so you shouldn’t be overly concerned about trying to get all of the cards from an epic onto a single sprint. Most of the time you’ll be better off working on the cards that fit naturally into the sprint, which are the blockers and other high priority cards. That said, the sooner an epic is finished the sooner you get to deploy that awesome new feature, so don’t let open cards dangle on an epic for too long before you complete them. And if you’re trying to figure out how epics and sprints differ, epics are used to group together cards that collectively achieve some goal, and sprints are used to timebox your work so you can measure and improve how well you’re cranking out new features. We hope using epics will keep you more organized so you can ship code faster than ever.

Create the perfect workflow with multiple workspaces

If you’ve ever wanted multiple boards for your project, this is the feature that does it! A project can now have multiple workspaces. Each workspace has its own boards, sprints, and burndown charts. Your cards now live on a project workspace and can be moved between workspaces. There’s also a new way to manage your incoming cards. It’s called Triage and it lets you quickly move your cards to the appropriate workspace.

Workspaces

All projects now have at least one workspace. You can add more workspaces to your project in the “Project Settings” view. A workspace houses your cards. Cards can only be on one workspace at a time, or they can be in Triage. Sprints are also scoped to workspaces, which means that workspaces are relatively independent of one another.

If you’d like to move cards between workspaces, all you have to do is open up a card and select a different workspace from the workspace dropdown selector. The card will show up in the default new column (probably called Inbox) of the new workspace.

Zube card showing workspace selector

Triage

When your project has more than one workspace, all incoming cards from GitHub will show up in the Triage view. The Triage view lets you order your cards; give them priorities, assignees, labels, etc.; and move your cards to the appropriate workspace when they should be worked on. You can move a card to a workspace by simply dragging the card into a workspace dropzone on the right hand side. You can also perform bulk actions in the triage view like labeling multiple cards at the same time, or moving multiple cards to a workspace at once. To perform bulk actions, select multiple cards and use the “Update Selected Cards” or “Move Selected Cards” actions.
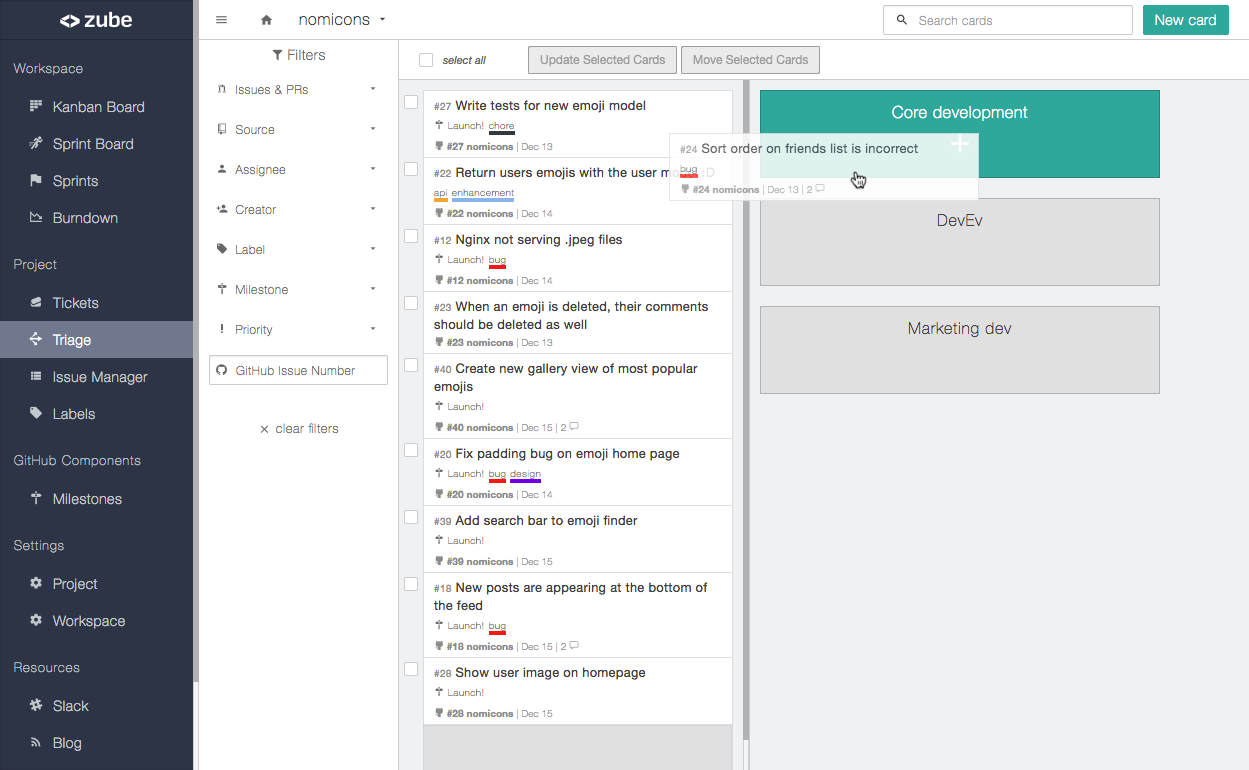
The Triage View

If you only have one workspace for your project, you can still use the Triage view if you would like to by enabling it in the Project Settings. Also, if you’ve tried out multiple workspaces and it wasn’t a good fit for your company, you can disable the Triage view from the Project Settings page as long as you have deleted all but one workspace.

Miscellaneous Improvements

Card Numbers: Cards now have numbers, which are sequential and unique to a project. This makes it easy to know which card you are talking about in your project. The GitHub repository name and GitHub issue number are included on the card as well, so it is still clear which GitHub issue is backing the card. The search fields scattered around Zube have been updated to search for the Zube card number (or card title) and not the GitHub issue number. If you would like to search for a card by the GitHub issue number you can do so using the new GitHub issue number search field in the sidebar filter.

The other functionality change related to the new card numbers is in comment forms. You can now reference Zube cards by their Zube number by typing “z#” followed by a number. An autocompleter will pop up letting you choose a Zube card. Be sure to select the appropriate card from the autocomplete list because card references are now markdown links. Use this new feature when you want to create links that go to Zube, even when viewing the comment on GitHub. If you want to create links that go to GitHub you can still references GitHub issues the same way as before by typing ‘#’ followed by a number.

Descriptive URLs: We redid all of the URLs so they include the account, project, and workspace name if applicable. Also, since cards now have unique numbers on Zube, a card URL now ends in the Zube card number. For example “/my-company/project-awesome/c/279” links to card #279 on project “Project Awesome”. If you have hard coded URLs or bookmarks to Zube pages, those are going to break. We are really sorry about that and we promise we won’t change the URLs again so your URLs won’t break going forward.

Sprint dates: Start and end dates on sprints are now enforced. Having mandatory start and end dates is going to make reporting easier. While they are required, the start and end dates aren’t set in stone. You are free to change them whenever you like.
A design that materialized from our obsession with usability

We didn’t sit down last week to give Zube a fresh new look. All we wanted to do was to make the cards on the kanban board easier to read. But once we started, we quickly became obsessed with how good design could make it easier for you to manage your entire project. Here’s an overview of what we improved.

The kanban board

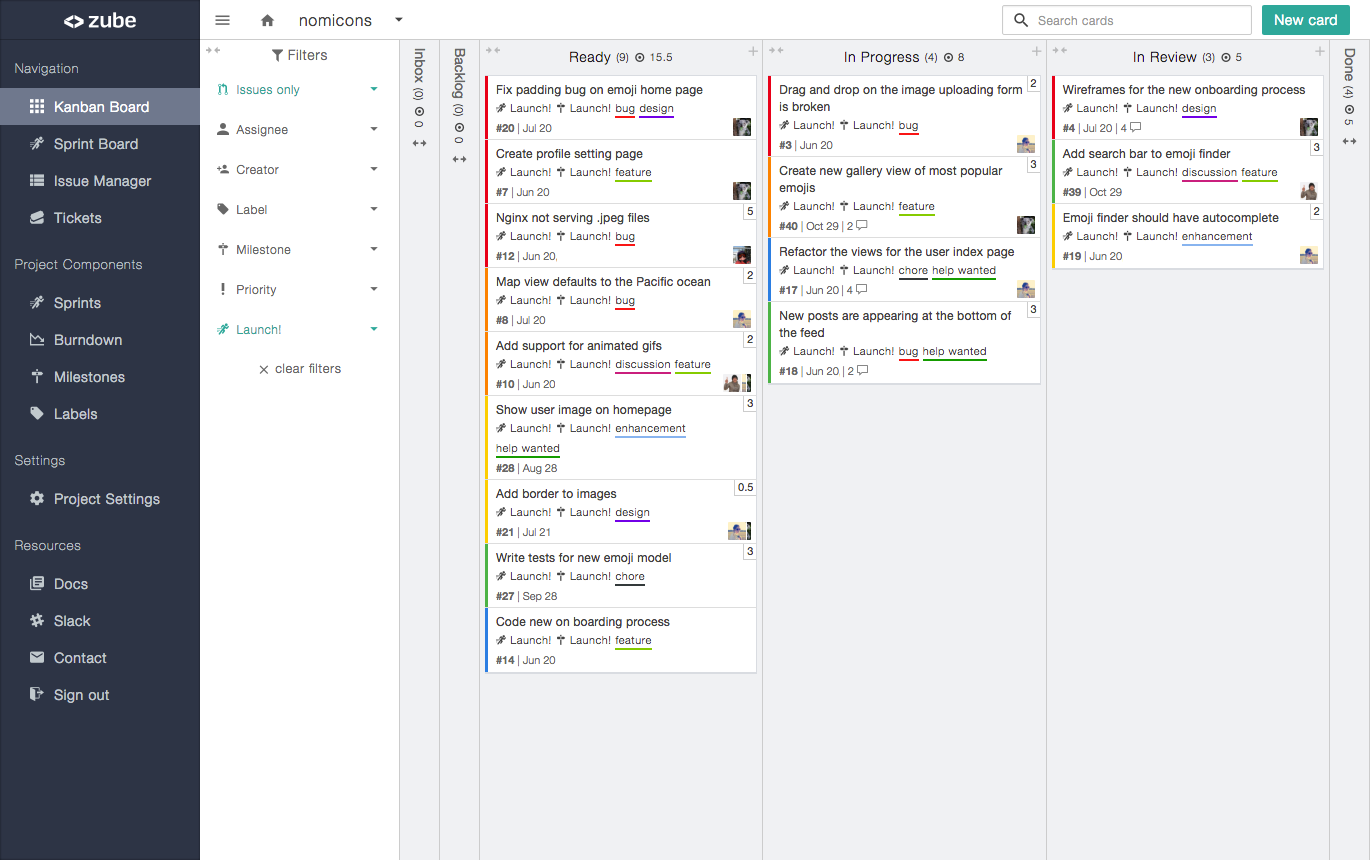
Must see more cards! We got rid of the space between the cards within their categories so they butt up against each other and form a column. Not only do more cards fit on the screen, but they are also easier to read because the new design eliminates grid illusion .

Redesigned kanban board showing filter sidebar

We also moved the board filters from the top of the board over to a sidebar on the left. What’s more, we made board filtering more powerful by adding the ability to filter on priority and creator! It’s now easier to filter out the noise and focus on high priority issues.

The issue manager

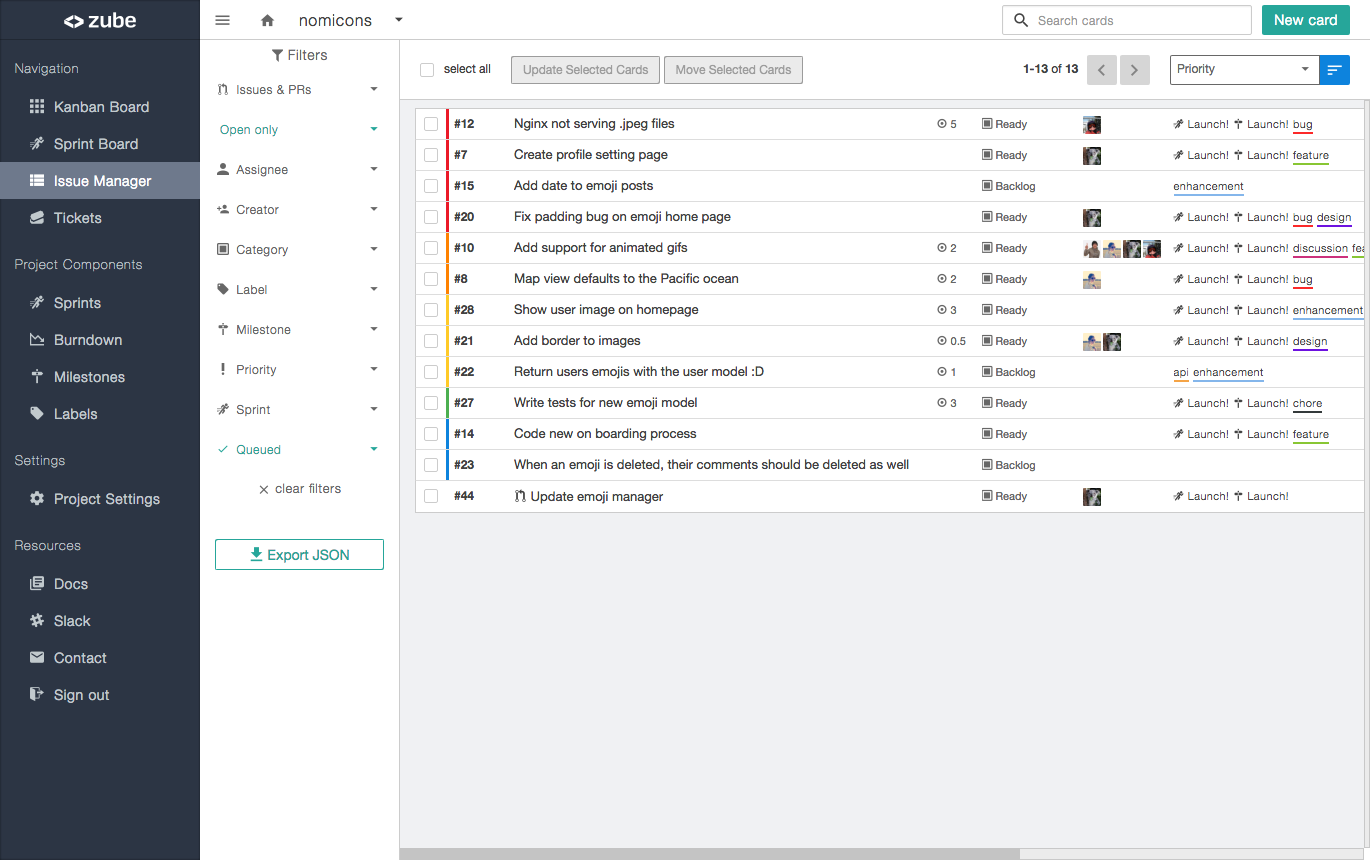
The issue manager has always been a super powerful way to manage your issues (hence the name). You can quickly filter and search across your entire project and perform bulk actions, even if your project is made up of multiple repositories. What’s been missing, until now, was a design that highlighted just how powerful the Issue Manager really is, so the new Issue Manager design is all about data density and scannability. Each issue only takes up a single line with the most important information up front. Basically, it’s an awesome table :)

The new Issue Manager design

Create a custom workflow for your kanban board and sprint board with customizable columns

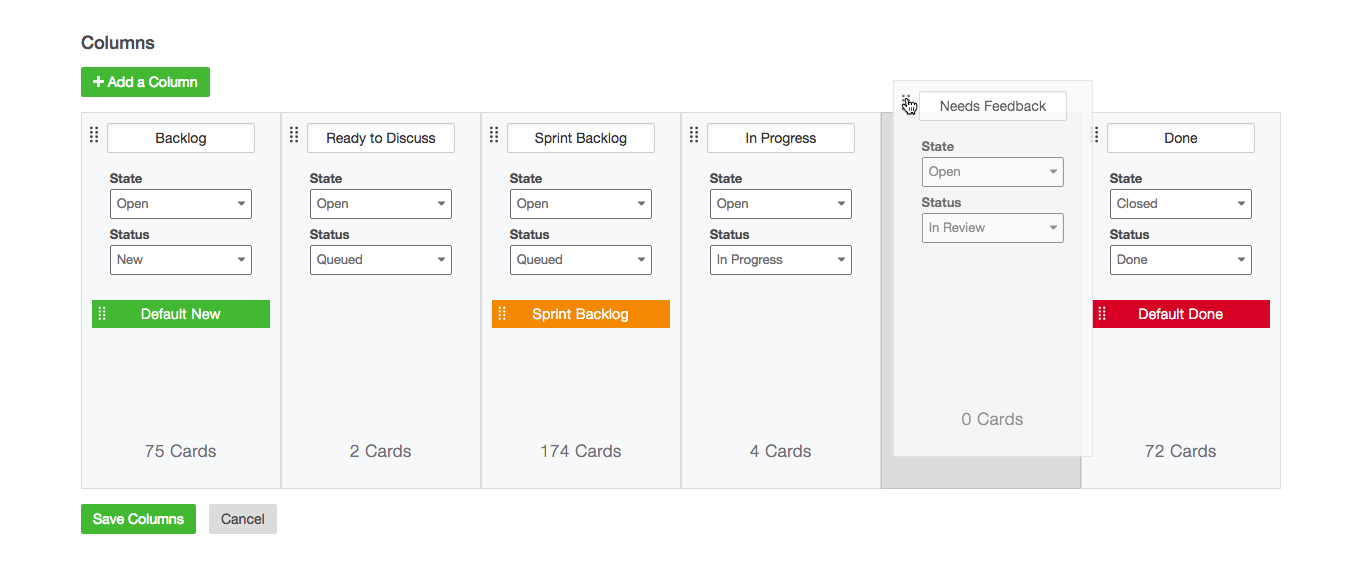
It’s now possible to customize your columns on Zube. Up until now, Zube had a standard set of columns for a basic Agile workflow. In this latest release, we have added the ability to customize your columns by changing their title, adding or removing columns, and by specifying default columns for your new cards and closed cards.

The column editor

You can customize your board columns by going to the new column editor found on the project settings page. You can get to any project’s settings page from the homepage or from the left sidebar. Once you’re on the project’s settings page, you can remove any column you wish by clicking “Remove” at the bottom of each column. You can also add columns and edit their attributes.

Column editor on the Project Settings page

Column attributes and markers

Once you’re editing the columns you can change the column’s attributes, including the name, state, and status. You can also change the which column is used as the default for new cards and closed cards, and which column marks the beginning of the sprint board.

State (open or closed):

A column’s state attribute can be open or closed. Any cards that are added to the column will be opened/closed on Zube and on GitHub. So, for example, if you change the state of your “In Review” column to Closed, then whenever you drag cards into the In Review column, the cards will be closed on Zube and on Github.

Status (New, Queued, In Progress, In Review, and Done):

The status attribute indicates which stage of the workflow the columns represent. These statuses are used to track the progress of cards through the workflow. When cards are add to a column, they will be given the same status as the column. Zube Tickets will automatically track the status of their linked cards, and update their own status accordingly. We’ve also enhanced the Issues Manager so you can find cards with a particular status!

Column markers (Default New, Default Done, and Sprint Backlog)

We’ve also made it possible for you to specify which columns you’d like to have special properties. If a column has the Default New marker, then any new cards created on Zube or GitHub will appear in that column. Similarly, the Default Done marker indicates the column where closed cards will move to automatically when they are closed on GitHub. Finally, there’s the Sprint Backlog marker. The column with the Sprint Backlog marker is the first column of your Sprint Board. All columns to the left of the sprint backlog are global columns, meaning that they will always be visible on the sprint board no matter what sprint you’re looking at. The sprint backlog, and all columns to the right of it are local to the sprint, meaning they will only show cards on the actively selected sprint. And as always, cards in the sprint section of the sprint board are automatically sprinted and trackable via the burndown chart.

Happy customizing!